


I’m trying something new. As an indie author who is slowly piecing together the writing thing, the marketing thing, the business of the writing and the marketing things, and all the other things, I’m thinking it might be nice to document the whole process a little more closely. I’m not the only one starting from scratch, and I think we can all learn from and help each other out here.
So, this new thing is going to be a work in progress. That means if you’re here for the full deal on Pinterest for Business, we’re in the same kayak, my friend. I’m learning as I go and I’ll be updating as I can. This first post will explain the simplest parts: signing up for the account, setting up your profile, and starting your first board!
A Pinterest business account is different from a personal account. First of all, to get a business account, you have to start here. Provide your email address, a password, business name, and business type and you’re good to go. (Optionally, you can also provide your business web address).
Once you’re in–assuming you’ve had experience using Pinterest as an individual–things should look pretty familiar. There are some differences, which I’m planning to discuss in the future. Right now, let’s keep it simple. Let’s also assume you’re completely new to Pinterest, just in case you are.
Over in the top right-hand corner, the last icon is your profile icon. If you scroll over that, you’ll get a drop-down menu with some options.
- Your profile – this takes you to a main page that shows your profile info, your pin showcase, and your boards. Very fancy.
- Settings – this takes you to a page where you can find your business account basics, profile info, notifications, home feed, social networks, and apps. These are all the settings you can tweak to make your account work the way you want it to.
- Billing – this takes you to your options for your Pinterest ads.
- Ads Support, Help, and Logout – these are exactly what the names indicate.
Let’s take a look at *Settings* for your profile info. This is where you can list your business name and add a pretty profile picture. You also have your Pinterest username, options to include some info about your business, your location, and a place to list your website address.
I chose to use my author headshot as my profile image, but at different times, I might change that out in favor of one of my book covers. Because I’m still making a name for myself online, I use my author headshot on most of my social media to give consistency to my brand. Feel free to do the same–or try something else and let me know how it goes for you!
Add whatever info you’d like to add and make sure to hit *Save Settings* before you leave the page! This should take you out to your main profile page–do you see the info and picture you just added? Hooray! You’re now officially rocking out as an indie author on Pinterest.
Let’s get your first board going!
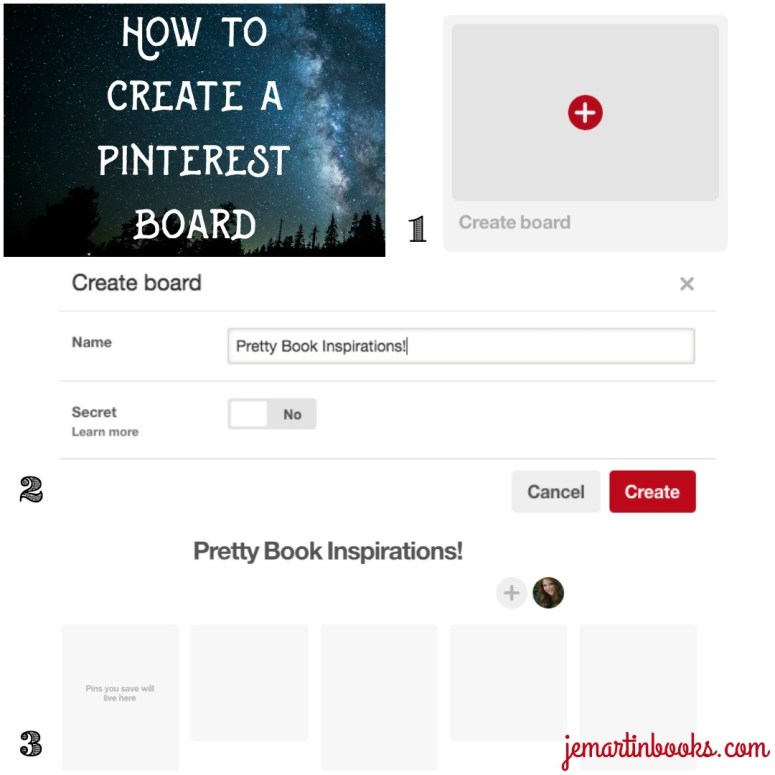
- If you scroll down on your profile page, you should come to something that looks like this. Hit the red plus sign.
- Decide what you want to name your board. This board isn’t one of my real boards, but it could be!
Choose whatever you think you might want to share first. I use Pinterest for visual inspiration when I’m writing and to share writing tips. If you look at my profile, that’s what you’ll find (and be sure to follow me while you’re there so we can connect!).
A secret board is a board only you can see. I use secret boards to house things I might want to share in the future. Any inspiration that might provide spoilers for future books goes into secret boards. Mwuhaha.
Once you’ve chosen a name (and decided whether or not this board is secret) click “Create”. - Ta-da! You’ve got a board! Now you’re ready to start adding some pins. Do a dance. Have some wine. You’re making this look easy.
Now, let’s add a pin to that shiny new board of yours.

- Let’s look back up at that menu along the top. Click that little gray plus sign.
- You have several options here. First, you can save something from a website.
Sidenote: if you’re using Google Chrome like I do, Pinterest will probably prompt you to get the Pinterest browser button from Chrome. Up to you. I use it all the time–if I’m on a site and find something I want to save, I can click the browser button, and it will automatically pop up with the picture options from that site. I can select and save pins straight from there. I like it–you may not. You do you, friend.
For the sake of this example, let’s work right from Pinterest.
Paste the web address you want, click next, and follow the prompts.
You’ll choose an image to use for your pin. When you mouse over the image, a red *Save* command will appear in the top right-hand corner. Click that. Then, you’ll get a pop-up menu.
In this menu, you can choose which board to save to (you can also create a new board to save to) and you can add info beneath the pin itself. I like to add a bit of info about the pin, personally, though not everyone does this. Since many of my images are character or location inspiration, I prefer to provide some background. - If you’re more interested in saving something from your own files, you can do that too!
For this, you go with the “Upload an Image” option.
Browse your files for your image, add a destination URL if you want (a website the image will be linked to), and hit *Continue*.
Once you do so, you’ll see the same menu I mentioned in Step 2. Pick the board, save the pin, and boom.
Your first board and pin are ready to share with the world!
Now, you can everyone about your new Pinterest account and start adding followers!
Next time, we’ll discuss Analytics and what they can teach you while you continue to grow your Pinterest for Business account as an indie author!
Over to you. Do you use Pinterest for Business? What are your favorite tips and tricks? Let me know–I’d love to hear from you!


This is a helpful guide on setting up Pinterest Business account.